Bringing Spring Indoors: Mastering the Daffodil Greenhouse Shadowbox SVG
As the frost begins to thaw and the days grow noticeably longer, crafters everywhere feel that familiar itch to create something that celebrates renewal. There is perhaps no better symbol of this seasonal transition than the daffodil, with its cheerful yellow trumpet announcing the arrival of warmer weather. For paper crafting enthusiasts and DIY home decorators, capturing this ephemeral beauty in a permanent display has become a beloved tradition. The Daffodil Greenhouse Shadowbox Spring SVG offers a sophisticated yet accessible way to bring the garden inside, transforming standard cardstock into a multi-dimensional work of art perfect for Easter decor or general springtime ambiance.
Understanding how to work with layered shadowbox files is about more than just cutting paper; it is about learning the interplay of light, depth, and color. Whether you are a beginner unboxing your first cutting machine or an experienced crafter looking to refine your assembly techniques, this design serves as an excellent educational tool for mastering paper engineering. Let’s explore the significance of this project, the technical considerations for modern cutting machines, and the creative possibilities that make this specific greenhouse design a standout addition to your seasonal repertoire.
The Significance of Layered Paper Art in Modern Crafting
Shadowbox art, often referred to as layered paper art or 3D papercutting, has seen a massive resurgence in the digital crafting era. Historically, creating dimensional paper scenes required intricate hand-cutting skills and architectural drafting knowledge. Today, scalable vector graphics (SVG) have democratized this art form, allowing anyone with a compatible machine to produce professional-grade results. However, the ease of cutting should not overshadow the artistic principles at play.
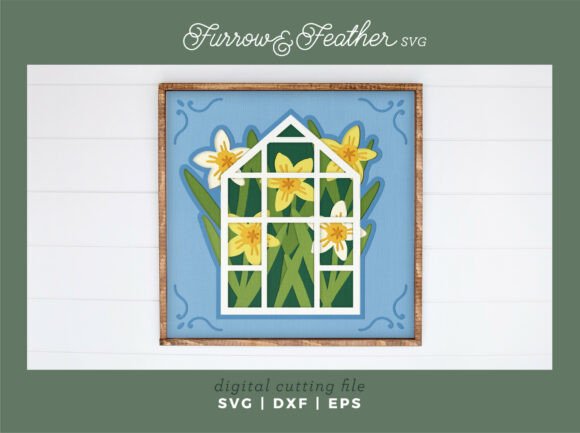
A successful shadowbox relies on the separation of planes. In the context of the Daffodil Greenhouse design, each layer represents a different depth of field. The background might depict a distant sky or fence, while the middle layers establish the greenhouse structure, and the foreground layers bring the daffodils and foliage into sharp focus. This mimics how the human eye perceives depth in real life. When backlit, these layers create silhouettes and shadows that give the piece its signature "shadowbox" name. Understanding this relationship between physical spacing and visual perception is key to appreciating why this format is so effective for spring decor.
Technical Compatibility and Machine Considerations
One of the most common questions crafters face is whether a specific file will work with their equipment. This Daffodil Greenhouse design is specifically optimized for versatility, but understanding your machine's capabilities ensures success.
Cricut Joy Xtra and Silhouette Portrait Compatibility
This design is explicitly compatible with the Cricut Joy Xtra and the Silhouette Portrait. These machines are popular choices for crafters who want precision without the footprint of industrial-sized cutters. However, compatibility goes beyond mere file format. It involves understanding the cutting mat size and material limitations.
- Material Size: The design fits standard 8.5 x 11” cardstock. This is crucial because it allows users to utilize widely available paper without needing specialty-sized sheets. It also maximizes efficiency on smaller mats.
- Base Dimensions: The shadowbox measures 8×8” before being resized. This square aspect ratio is aesthetically pleasing and fits perfectly into standard square frames, making framing hassle-free.
- Scalability Warnings: While the file is technically scalable to any size, practical physics applies. When downsizing below the recommended 8x8 dimensions, small details such as flower stamens or greenhouse lattice work may become too delicate to weed cleanly. Always perform a test cut if you plan to significantly reduce the size.
Customization: Elevating Your Design Through Color
While the default design is beautiful, true craftsmanship shines through personalization. The prompt to change the colors of layer 1 and 2 for a more unique look is not just a suggestion; it is an invitation to understand color theory in paper art.
In layered designs, the bottom layers (often layers 1 and 2) typically serve as the backdrop or sky. Changing these foundational colors alters the entire mood of the piece. For example, swapping a pale blue sky for a soft lavender can shift the aesthetic from "bright morning" to "twilight garden," making it suitable for evening Easter gatherings. Alternatively, using a warm cream or buttery yellow in the base layers can enhance the glow when LED lights are added behind the box.
This customization extends beyond solid colors. Experienced crafters often use gradient cardstock or patterned paper for these base layers to add texture without adding bulk. By experimenting with these foundational elements, you transform a mass-produced digital file into a bespoke piece of home decor that reflects your personal style and the specific color palette of your living space.
Assembly Best Practices for Beginners and Experts
Cutting the pieces is only half the journey; assembly is where the magic happens. The fact that the layers are numbered for easy assembly is a critical feature that reduces frustration, especially for those new to shadowboxes. Here is a systematic approach to assembling this daffodil greenhouse:
- Organization is Key: Before applying any adhesive, lay out all pieces in numerical order. Verify that every component from the digital file has been cut correctly. Missing a single spacer layer can collapse the 3D effect.
- Adhesive Selection: Avoid liquid glues that can warp cardstock. Foam tape or silicone glue dots are superior for shadowboxes because they provide physical spacing between layers. This gap is essential for allowing light to pass through and creating the actual shadows that define the art form.
- Alignment Tools: Use a bone folder to crisp edges and alignment jigs or ruler guides to ensure layers are stacked squarely. Even a millimeter of misalignment becomes obvious when light shines through the finished piece.
- Lighting Integration: If you plan to illuminate the greenhouse, install your LED strip or puck light before sealing the final layer. Test the lighting at each stage of assembly to ensure no hot spots or unwanted shadows obscure the daffodil details.
Integrating Shadowbox Art into Seasonal Decor and Gifting
The practical relevance of this project extends far beyond the crafting table. In modern interior design, there is a growing appreciation for handmade, tactile decor that contrasts with our increasingly digital lives. A lit Daffodil Greenhouse shadowbox serves as a stunning focal point on a mantlepiece, entryway console, or Easter brunch table.
Furthermore, these projects have significant value in the realm of personalized gifting. Unlike store-bought decorations, a handmade shadowbox carries emotional weight. It demonstrates time, effort, and thoughtfulness. For educators or community leaders, assembling these boxes can also serve as a group activity that teaches patience, fine motor skills, and following sequential instructions. The scalability of the design means you could create a large centerpiece for a church or school lobby, or miniature versions as individual favors for a spring wedding.
Expanding Your Creative Horizons
Mastering one design opens the door to a wider ecosystem of seasonal crafting. Once you are comfortable with the layering logic and assembly techniques of the Daffodil Greenhouse, exploring other thematic files becomes intuitive. We encourage you to check out my shop for other delightful spring cutting files to continue building your skills. Perhaps a tulip garden, a butterfly conservatory, or a rainy day window scene is next on your list.
Each new design reinforces the concepts learned previously while introducing new challenges. Maybe the next file requires scoring lines for curved elements, or perhaps it introduces movable parts. This continuous learning cycle is what keeps paper crafting engaging year after year. Additionally, browsing related designs helps you understand how different motifs can be grouped together to create cohesive seasonal vignettes in your home.
Common Misunderstandings About Digital Cutting Files
Before concluding, it is helpful to address a few assumptions that often trip up newcomers. First, many assume that "scalable" means "infinitely resizable without consequence." As mentioned earlier, vector math scales perfectly, but paper fibers do not. Respecting the minimum detail threshold prevents wasted materials and disappointment.
Second, some crafters believe that thicker cardstock always yields better results. While heavy stock provides stability, it can also block light transmission in a shadowbox. For the inner layers of this daffodil design, medium-weight cardstock (65lb to 80lb) often provides the best balance of opacity and translucency. Only the outermost frame and primary structural elements typically require heavyweight cardstock.
Finally, there is a misconception that digital files lack the "soul" of hand-drawn art. On the contrary, these files are the product of meticulous digital illustration and engineering. They provide a foundation upon which your unique color choices, assembly precision, and lighting decisions build a truly original creation. The technology facilitates the art; it does not replace it.
Final Thoughts for Happy Crafting
The Daffodil Greenhouse Shadowbox Spring SVG is more than just a seasonal decoration; it is a gateway to understanding the intersection of technology, art, and seasonal celebration. By respecting the technical specifications of your Cricut Joy Xtra or Silhouette Portrait, embracing the creative freedom of color customization, and approaching assembly with patience and precision, you can create a lasting tribute to the beauty of spring.
Remember to visit the shop for other fun shadowbox cutting files to keep your creative momentum flowing throughout the season. Whether you are crafting for yourself, for gifts, or for community events, the joy lies in the process as much as the result. Gather your cardstock, prep your cutting mat, and let the layers unfold. Happy crafting!