Rainbow Greetings Card SVG: Crafting Cheerful Cards Without Common Pitfalls
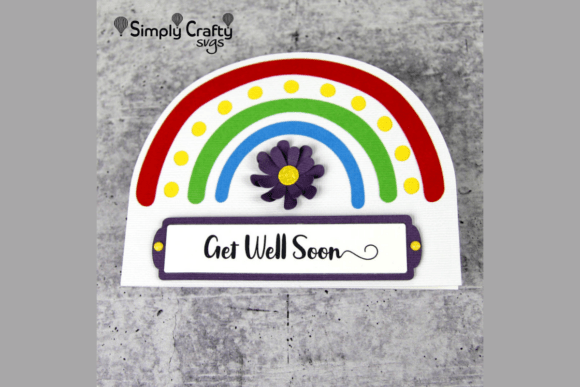
Creating handmade stationery is one of the most rewarding ways to connect with others, but even experienced crafters can stumble when working with intricate digital files. The Rainbow Greetings Card SVG stands out as a vibrant, multi-layered design that brings immediate joy to any recipient. Its arched motif and cheerful color palette make it a staple for spreading positivity, yet the success of your final project depends heavily on how you approach the file preparation and assembly process. Understanding the nuances of this specific design ensures that your time at the cutting machine translates into a professional-quality card rather than a frustrating pile of paper scraps.
Understanding the Design’s Versatility Before Cutting
A frequent oversight occurs when creators treat every SVG file as a single-purpose project. This particular design is engineered for adaptability, featuring four distinct printable tags: “Love You More,” “Get Well Soon,” “Thinking of You,” and “You Are the Best.” Additionally, a blank tag is included for custom messages. Many users mistakenly cut all variations at once or fail to isolate the specific sentiment layer in their cutting software before sending the job to the machine. This wastes premium cardstock and adhesive.
Before you press start, verify which sentiment layer is active. If you are using the blank tag option for a personalized note, ensure the text layers for the pre-written sentiments are hidden or deleted from your canvas. This simple check preserves your materials and keeps your workspace organized. Furthermore, consider your message before selecting your paper colors. While the rainbow theme is universally appealing, the contrast between your chosen cardstock and the printed tag matters. Darker textured backgrounds may require lighter tag paper to ensure the sentiment remains legible and visually balanced.
Avoiding Dimensional Assembly Errors
The multi-layered nature of the Rainbow Greetings Card SVG is its greatest asset, providing depth and tactile interest that flat printing cannot achieve. However, this dimensionality is also where most assembly mistakes happen. A common error is relying solely on liquid glue for attaching the rainbow arches. Liquid adhesives can cause paper to warp or buckle, especially when working with textured cardstock like American Crafts AC Textured Cardstock. Warping distorts the clean lines of the arch and prevents the card from lying flat.
To maintain structural integrity and a polished look, use foam tape for the rainbow layers. Foam tape creates consistent spacing and adds the intended pop without saturating the paper fibers. Reserve liquid glue only for the base layer or small, detailed areas where foam tape is too bulky. Another critical detail often overlooked is burnishing. After applying each layer, gently rub over the surface with a bone folder or clean fingertip to ensure full adhesion. Skipping this step leads to peeling edges over time, which diminishes the perceived quality of your handmade gift.
Sizing and Mailing Practicalities
Nothing is more disappointing than finishing a beautiful card only to realize it does not fit standard envelopes or requires excessive postage. The finished dimensions of this card are 5.5″ x 4.25″, specifically designed to fit perfectly into a standard A2 envelope. Some crafters attempt to resize the SVG to fit larger envelopes they already have on hand, assuming the design will scale proportionally. While vector files are scalable, resizing complex multi-layered cards can disrupt the alignment of score lines and tag placement.
If you must adjust the size, do so by scaling the entire group as a single unit rather than adjusting individual layers. However, sticking to the original 5.5″ x 4.25″ dimensions is strongly recommended to guarantee compatibility with A2 envelopes. Equally important is the card’s ability to flatten completely. Despite its dimensional elements, this design is engineered to compress safely for mailing. Avoid adding embellishments like gems, buttons, or thick ribbon bows to the front face. These additions create pressure points inside the envelope, potentially damaging the card during postal sorting or requiring non-machinable surcharges. Keep the exterior smooth to ensure easy transport and affordable postage.
Material Selection and Color Management
The visual impact of the Rainbow Greetings Card SVG relies heavily on material choice. Using flimsy or low-weight paper for the base can result in a card that feels insubstantial and fails to support the layered top elements. American Crafts AC Textured Cardstock (12 x 12 inch) is recommended because its weight and texture provide the necessary foundation for multi-layered builds. Substituting with standard printer paper or lightweight scrapbook paper often leads to sagging arches and poor adhesive performance.
Color accuracy is another area requiring attention. If you are printing the sentiment tags at home, calibrate your printer settings to match your cardstock. Colors on screen rarely match ink on paper perfectly. Print a test tag on the same paper stock you intend to use for the final project. Check for banding, saturation issues, or misalignment before committing to the final print. Adjusting your printer profile or selecting the correct paper type setting can prevent wasted ink and mismatched aesthetics. Remember that the rainbow motif should complement the tag, not compete with it; balance your color saturation accordingly.
Leveraging Resources for Better Results
Even seasoned professionals benefit from guidance when working with new designs. A significant advantage of this product is the inclusion of a step-by-step video tutorial. Many users skip this resource, assuming their prior experience is sufficient. However, the designer’s video often contains specific tips regarding layer order, adhesive placement, and troubleshooting that are not obvious from the static file alone. Watching the tutorial takes only a few minutes but can save hours of rework and frustration.
Treat the video as an essential part of your toolkit, not an optional extra. Pay close attention to how the instructor handles the transition between layers and any specific recommendations for scoring or folding. These nuanced details differentiate a homemade-looking card from a professionally crafted piece. Additionally, if you encounter issues during assembly, revisit the relevant section of the tutorial before attempting to fix the problem through trial and error. The solution is often demonstrated visually in ways written instructions cannot convey.
Final Quality Checks Before Gifting
Before placing your completed Rainbow Greetings Card into an envelope, perform a thorough quality inspection. Check for stray adhesive marks, uneven layers, or misaligned tags. Ensure the card opens and closes smoothly without catching on internal elements. Verify that your handwritten message on the blank tag is centered and legible. These final touches demonstrate care and respect for both the craft and the recipient.
By approaching the Rainbow Greetings Card SVG with intention and awareness of these common pitfalls, you transform a digital file into a meaningful, tangible expression of connection. Whether you are crafting for a friend needing encouragement, a family member celebrating a milestone, or a client receiving a thank-you note, the effort you invest in proper execution elevates the entire experience. Thoughtful preparation, appropriate materials, and attention to technical details ensure that every card you create truly embodies the cheer and positivity this design was meant to convey.