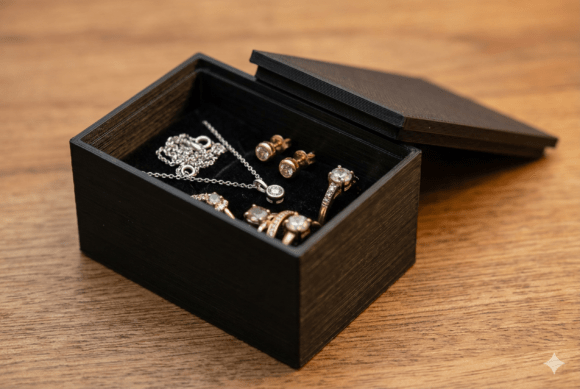
Minimalist Small Box with Lid: A Practical Guide to Digital Fabrication
The appeal of a Minimalist Small Box with Lid lies in its deceptive simplicity. On the surface, it is merely a geometric container for rings, earrings, coins, or other small treasures. However, for makers and DIY enthusiasts downloading digital files to print at home, this project serves as an excellent benchmark for precision, material selection, and functional design. Unlike complex artistic sculptures, a storage box must actually work. The lid must fit securely without being too tight, the walls must be thin enough to look elegant but thick enough to provide structure, and the finish must feel intentional rather than accidental.
Many creators approach this digital download with enthusiasm, only to encounter friction during the printing or assembly process. These issues rarely stem from the design file itself but rather from a mismatch between the digital blueprint and physical execution. By understanding where others typically stumble, you can transform a simple PDF template into a professional-grade object that functions beautifully as both personal storage and a thoughtful gift.
Evaluating File Compatibility Before Downloading
The most common oversight occurs before the printer even warms up. Not all digital box templates are created equal, and assuming universal compatibility is a frequent error. When you decide to download a printable box pattern, you must verify the file format against your specific fabrication method. A template optimized for laser cutting on 3mm plywood will likely fail if printed on standard cardstock or cut with a Cricut blade. The kerf (the width of material removed by the laser or blade) differs significantly between machines and materials.
If you ignore these technical specifications, your minimalist box may suffer from structural failure. Tabs might be too loose, causing the box to wobble, or slots might be too narrow, making assembly impossible without breaking the material. Always check the designer’s notes regarding recommended material thickness and machine settings. If the file does not specify these parameters, perform a test cut on scrap material first. This extra ten minutes prevents wasted premium paper or wood and ensures your final product maintains the clean lines essential to minimalist aesthetics.
Material Selection Beyond Visual Appeal
Aesthetics often drive material choice, but functionality must dictate it. A frequent mistake is selecting paper or board based solely on color or texture while ignoring weight and grain direction. For a Minimalist Small Box with Lid, structural integrity is paramount. Using paper that is too light (under 250gsm) results in a flimsy container that cannot support the weight of jewelry or coins. Conversely, using material that is too heavy for the designated fold lines leads to cracking and fraying at the edges, ruining the sleek appearance.
Grain direction is another critical, often overlooked factor. Paper and cardboard have a grain resulting from the manufacturing process. Folding against the grain creates resistance and increases the likelihood of fiber breakage. For a box with a lid, the grain should ideally run parallel to the primary folds to ensure crisp, straight creases. If you are working with wood veneer or thin basswood, the grain determines the strength of the interlocking joints. Aligning the grain incorrectly can cause tabs to snap off during assembly. Taking a moment to identify and respect the material's natural properties elevates the perceived quality of the finished piece from "homemade" to "handcrafted."
Precision in Scoring and Folding
In minimalist design, there is nowhere to hide imperfections. A crooked fold or a torn edge becomes the focal point. Many beginners attempt to fold thick cardstock or veneer freehand, believing they can achieve a straight line by eye. This almost always results in rounded corners or misaligned panels. To achieve the sharp, architectural look associated with minimalist boxes, scoring is non-negotiable.
Use a dedicated scoring tool, bone folder, or the back of a butter knife along a metal ruler to compress the fibers before folding. This creates a controlled hinge point. When working with digital templates, ensure your scoring lines align perfectly with the cut lines. A misalignment of even half a millimeter compounds across four sides, resulting in a lid that sits askew. For those printing directly onto cardstock, calibrate your printer margins carefully. Home printers often shift images slightly; printing a registration mark or border allows you to verify alignment before committing to the final cut. Precision here distinguishes a functional storage solution from a frustrating craft failure.
Assembly Logic and Adhesive Choices
The assembly phase is where patience is tested. Rushing the gluing process is a primary cause of poor outcomes. Using liquid glue excessively causes paper to warp and buckle as it dries, destroying the flat planes required for a minimalist aesthetic. Alternatively, using glue that sets too quickly prevents necessary adjustments, locking mistakes in place permanently.
Consider the adhesive as part of the design specification:
- Dry adhesives: Double-sided tape sheets or glue runners are often superior for paper boxes because they add no moisture and create instant bonds.
- PVA Glue: If using liquid glue, apply sparingly with a fine tip applicator or brush. Clamp or hold the joint until set to prevent shifting.
- Interlocking designs: Some digital files rely on friction-fit joinery rather than glue. In these cases, do not force joints. If they require excessive pressure, the material is too thick or the kerf compensation is wrong. Sanding tab edges lightly is better than risking a tear.
Always assemble the box body first and allow it to fully cure before attempting to fit the lid. Testing the lid fit while the body glue is still wet can distort the shape, leading to a permanent mismatch.
Functional Considerations for Jewelry Storage
When creating a box specifically for rings and earrings, interior protection matters as much as exterior form. A common oversight is finishing the box without considering what touches the stored items. Rough paper interiors or exposed adhesive residues can scratch delicate metals or snag fabrics. Before final assembly, inspect all interior surfaces. Lining the box with acid-free tissue, velvet paper, or felt adds a layer of luxury and protection that aligns with the item's purpose.
Furthermore, consider the lid's interaction with the contents. A lid that fits too tightly can dislodge earring backs or press down on ring stones when closed. Test the clearance with the actual objects intended for storage. If the fit is snug, adding a small finger notch or pull tab to the lid design improves usability without compromising the minimalist silhouette. Functionality enhances the user experience, making the box a practical tool rather than just a decorative shell.
Making It a Thoughtful Gift
If this Minimalist Small Box with Lid is intended as a gift, presentation extends beyond the object itself. Avoid over-embellishing the exterior, which contradicts the minimalist ethos. Instead, focus on tactile details and context. Pair the box with a handwritten note explaining the materials used or the inspiration behind the design. This narrative adds value that mass-produced packaging lacks.
Ensure the box is clean and free of fingerprints, pencil marks, or glue strings. These small details signal care and competence. When recipients see that the maker has respected both the material and the design intent, the gift carries greater emotional weight. By avoiding common pitfalls and focusing on precision, material integrity, and functional foresight, you create more than just a container; you create a lasting example of thoughtful, intentional making.