Love You Card SVG: A Practical Guide to Cutting and Assembly
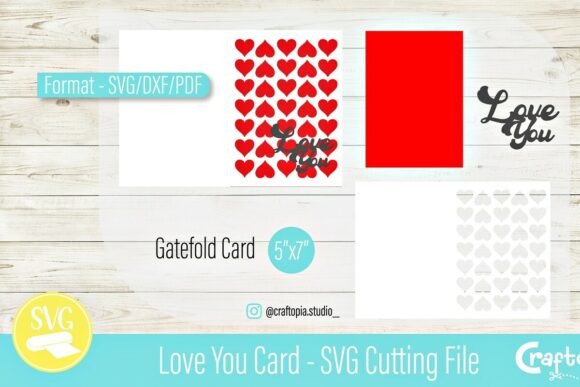
Expressing genuine emotion through handmade crafts requires a balance of heartfelt sentiment and technical precision. The Love You Card SVG offers a stylish solution for creators who want to communicate affection without spending hours designing from scratch. Featuring a front filled with intricate hearts and the phrase "Love You," this design serves as an elegant foundation for Valentine’s Day, anniversaries, or spontaneous celebrations. However, owning a high-quality digital file is only the first step. The difference between a professional-looking keepsake and a frustrating crafting failure often lies in how you prepare, resize, and assemble the project. Understanding the specific requirements of this 7″ H x 5″ W design ensures your cutting machine produces clean lines and your final card looks intentional rather than improvised.
Understanding File Compatibility and Format Selection
A common oversight among both beginners and experienced crafters is assuming all SVG files behave identically across different software platforms. While this I Love You Card SVG is optimized for broad compatibility, selecting the wrong format for your specific ecosystem can lead to missing elements or ungrouped layers. This design is provided in SVG, PDF, and DXF formats, and knowing which one to use prevents unnecessary troubleshooting.
- Cricut Design Space: Use the SVG file. It retains layer integrity and cut lines specifically mapped for Cricut machines.
- Silhouette Studio Basic (Free Edition): You must use the DXF file. The free version does not support SVG imports, and attempting to convert files externally often results in lost detail.
- Silhouette Studio Designer (Paid Edition): Use the SVG file for the best editing capabilities and layer management.
- Brother ScanNCut: Utilize the SVG or FCM format depending on your specific model's firmware update status.
Selecting the correct format before importing saves time and preserves the delicate heart details that make this card special. If your software opens the file but the score lines appear as cut lines, or vice versa, it is usually a format mismatch rather than a corrupted file.
The Critical Importance of Resizing Limits
Perhaps the most significant mistake makers encounter with intricate paper projects is aggressive downscaling. This Love You Card SVG is designed at 7 inches high by 5 inches wide. While the vector nature of the file theoretically allows for infinite scaling, the physical limitations of paper and cutting blades do not. Do not reduce the recommended size of this card.
When you shrink a design featuring detailed hearts below its intended dimensions, the negative space between cuts becomes microscopic. Standard cutting blades cannot navigate these tight turns without tearing the paper fibers. The result is a ragged edge, pieces stuck inside the mat, or a blade that drags and ruins the entire sheet. If you need a smaller card, it is better to choose a design originally created for miniature scales rather than forcing this 7x5 template into a 4x6 footprint. Conversely, increasing the size is perfectly safe and encouraged, provided your cutting mat accommodates the larger dimensions. Scaling up maintains structural integrity and often makes assembly easier for those with less dexterity.
Proper Scoring and Folding Techniques
This design includes a dedicated dotted line for easy bending, yet many users overlook the distinction between scoring and perforating. A score line compresses the paper fibers to create a crisp fold, while a perforation cuts partially through to allow tearing. For a greeting card, you want a clean fold, not a tear.
Ensure your machine settings are adjusted to "Score" rather than "Cut" for the dotted line. If using a Cricut, verify you have the scoring stylus or wheel selected in the tool clamp. For Silhouette users, confirm the ratchet blade depth is set correctly for scoring, or use the dedicated scoring tool. Ignoring this setting results in a card that splits open when folded or has a rough, torn spine that detracts from the polished front design. Additionally, always fold against the score line using a bone folder or the edge of a ruler. Hand-folding without a tool often creates rounded, uneven creases that make the card look homemade in the pejorative sense.
Material Selection for Intricate Cuts
The complexity of the heart-filled front panel demands appropriate cardstock weight. Using standard printer paper or lightweight text-weight paper will almost certainly result in failure. The blade will drag, and the paper will buckle under the pressure required to cut multiple layers.
For optimal results with this Love You Card SVG, select cardstock between 65lb and 80lb cover weight. This range provides enough rigidity to hold the shape of the card while remaining thin enough for precise cuts. Glitter cardstock, while beautiful, requires special consideration; the abrasive surface dulls blades quickly and the textured backing can obscure fine details. If you choose glitter paper, use a fresh blade and consider performing a test cut on a scrap piece first. Textured linen or felt-core cardstocks also work beautifully with this design, adding tactile interest that complements the visual pattern of hearts.
Digital Workflow and Instant Download Best Practices
Since this is a digital file for instant download, organization is part of the crafting process. A frequent error is downloading the file directly to a temporary folder or mobile device and then losing track of it. Before purchasing or downloading, establish a dedicated folder structure on your computer for digital designs. Create subfolders by category (e.g., "Cards," "Valentine," "SVG Files") to ensure you can locate the Love You Card SVG months or years later.
Always download all available formats immediately, even if you currently only own one type of machine. Your equipment may change, or you may collaborate with another crafter who uses a different system. Having the complete package (SVG, PDF, DXF) archived prevents future repurchasing. Furthermore, avoid editing the master file directly. Save a copy as "Love You Card - Edit" before making modifications like changing colors or adjusting sizes. This preserves the original, tested design as a fallback if experimental changes cause cutting issues.
Final Assembly and Presentation Checks
Before committing to your final expensive cardstock, run a test cut on inexpensive paper at the exact 7x5 dimensions. This verifies that your blade is sharp, your mat is sticky enough, and your pressure settings are calibrated. Skipping this step is the most common cause of wasted premium materials. Once the test is successful, proceed with confidence.
After cutting and folding, inspect the interior of the card. The backside of intricate cuts can sometimes show adhesive residue or slight fraying. A simple liner or insert can hide imperfections and provide a smooth surface for writing your personal message. Remember that the digital file provides the structure, but your personal touch completes the gift. Whether you are a small business owner creating inventory or a hobbyist making a single anniversary gift, respecting the technical parameters of this design ensures the final product honors the sentiment it represents. By avoiding common resizing errors, choosing compatible formats, and selecting appropriate materials, you transform a simple download into a lasting expression of love.