Cherry Embosser Cookie Cutter: Integrating 3D Printed Tools into Edible Art Workflows
The transition from standard baking to professional-grade edible art often hinges on the precision of your tools. For bakers, cake decorators, and content creators, the Cherry Embosser Cookie Cutter represents more than just a seasonal motif; it is a functional component in a digital fabrication workflow that bridges 3D modeling and culinary execution. Unlike traditional metal cutters or silicone molds, this toolset utilizes STL files designed specifically for FDM (Fused Deposition Modeling) printing, allowing for rapid iteration and customization directly in your kitchen or studio.
Understanding where this tool fits within your broader production process is essential for maximizing efficiency. The Cherry Embosser Cookie Cutter system is not merely a shaping device but a texturing instrument that adds dimensional complexity to fondant and cookie dough. By integrating downloadable STL assets into your repertoire, you move away from relying solely on pre-manufactured inventory. This shift allows professionals and hobbyists to control the entire supply chain, from digital file acquisition to physical print, ensuring that every cherry design aligns perfectly with specific project requirements, whether for a wedding cake, a bakery menu, or social media content creation.
Digital Asset Management and Pre-Print Preparation
Before any plastic is extruded, the workflow begins with proper file management. The product includes a ZIP folder containing one to two STL files: one for the cutter and one for the embosser. Treating these files as critical production assets rather than disposable downloads ensures long-term usability. Organize your STL library by theme, size, and version number. This organization prevents workflow bottlenecks when you need to locate specific designs during high-pressure decorating sessions.
Slicing software acts as the interface between the digital design and the physical tool. While the Cherry Embosser Cookie Cutter comes with preset dimensions, the ability to resize in your slicer is a significant operational advantage. However, scaling requires technical consideration. If you increase the size of the cutter beyond its default 3-inch specification, you must proportionally adjust wall thickness and infill density to maintain structural rigidity. Conversely, downscaling may require reducing layer height to preserve the fidelity of the cherry stem and leaf details. Always verify the blade depth remains within the optimal 15–16 mm range after resizing to ensure clean cuts without excessive resistance.
Material Selection and Print Settings
The performance of a 3D printed culinary tool depends heavily on material choice and print parameters. For the Cherry Embosser Cookie Cutter, food-safe PLA or PETG are standard choices due to their ease of printing and stiffness. However, the surface finish is paramount for release properties. A rough layer line texture can cause fondant to stick, ruining the embossed effect.
- Nozzle Size: Use a 0.4mm nozzle for the outer walls to ensure smooth perimeters, but consider a smaller nozzle if the cherry details are exceptionally fine.
- Layer Height: Set layers to 0.12mm or lower for the embosser face to minimize visible stair-stepping on the curved fruit surfaces.
- Infill: 100% infill is recommended for the embosser head to prevent flexing under pressure, which could distort the raised cherry image.
- Brim/Raft: Use a brim only on the non-contact side to avoid post-processing the working edge, which introduces contamination risks.
Post-processing is a non-negotiable step in this workflow. Even with optimal settings, 3D prints require finishing. Sand the cutting edge lightly with high-grit sandpaper to create a sharp bevel, and polish the embossing face to reduce friction. Applying a food-safe epoxy coating can further seal layer lines, making the tool easier to clean and safer for repeated commercial use.
Operational Distinctions: Cutter vs. Embosser Integration
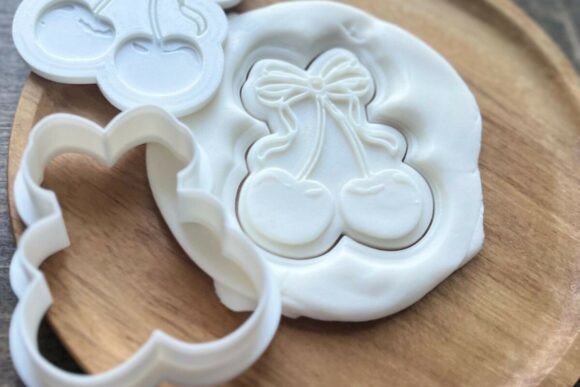
A critical aspect of implementing this toolset is understanding the mechanical relationship between the two components. Users accustomed to "stamp-and-cut" sets where the embosser fits snugly inside the cutter must adjust their mental model and physical technique. The Cherry Embosser Cookie Cutter set is engineered differently: the embosser is intentionally slightly larger than the cutter’s interior cavity.
This design choice serves a specific functional purpose. It creates a raised effect on the surface of the medium rather than an indented stamp. Attempting to force the embosser inside the cutter will result in damage to both the print and your dough. In your workflow, this necessitates a sequential rather than simultaneous application. You must first cut the shape, remove the cutter, and then apply the embosser independently. This separation of tasks actually offers greater creative flexibility, as it allows you to position the cherry design off-center or rotate it for dynamic compositions that a fixed stamp set would not permit.
Technique for Consistent Results
Achieving uniform results across a batch of cookies or fondant pieces requires standardized pressure and timing. Because the embosser creates a raised relief, the depth of the impression depends entirely on manual force. Developing muscle memory or using a simple jig can help maintain consistency.
- Surface Preparation: Ensure fondant is rolled to an even thickness. For cookies, chill the dough thoroughly before cutting to prevent spreading, which alters the canvas size for the embosser.
- Lubrication: Lightly dust the embosser with cornstarch or powdered sugar. Avoid oil-based lubricants on PLA prints as they can degrade the plastic over time.
- Alignment: Since the embosser does not self-align via the cutter walls, use visual guides or a light touch to center the design. Press firmly and evenly, rocking slightly if necessary to engage all details of the cherry and stem.
- Release: Lift straight up to prevent smearing. If the design sticks, allow the fondant to dry for 30 seconds before embossing next time.
Workflow Integration for Business and Creative Projects
For entrepreneurs and small business owners, the Cherry Embosser Cookie Cutter integrates into product development and marketing workflows. The low cost of entry—essentially just filament and electricity—allows for rapid prototyping of new menu items. Before committing to a large batch order, you can print a test cutter, produce samples, and photograph them for social media validation. This agile approach reduces waste and aligns production with actual market demand.
Educators and workshop leaders can utilize these files to teach the intersection of digital design and tactile craft. The cherry design provides a manageable complexity level for students learning about tolerances, positive/negative space, and material properties. In a classroom or maker-space setting, having multiple printers running different sizes of the same design demonstrates how parametric scaling works in real-world applications.
Content creators and bloggers benefit from the visual distinctiveness of 3D printed tools. Documenting the process—from downloading the STL to the final decorated cookie—provides rich, authentic content that resonates with audiences interested in DIY technology and baking. The unique texture achieved by the raised embosser photographs differently than standard royal icing flooding, adding visual variety to portfolios and feeds.
Maintenance, Storage, and Long-Term Usability
Treating 3D printed tools as durable equipment rather than single-use items extends their lifecycle and protects your investment. Hygiene protocols differ from stainless steel or silicone. Never place PLA or PETG prints in a dishwasher; the heat will warp the precise tolerances required for the embosser to function correctly. Hand wash with cool water and mild detergent immediately after use. Dry thoroughly to prevent moisture absorption, which can lead to bacterial growth in layer lines.
Storage organization should protect the delicate embossing features. Store the Cherry Embosser Cookie Cutter in a dedicated container where the detailed face is not resting against other hard objects. Consider printing custom storage inserts or using foam padding to prevent accidental damage. Labeling storage bins with the corresponding STL filename creates a feedback loop between your physical inventory and digital library, streamlining future retrieval.
Monitor tool wear over time. Plastic fatigue can occur at stress points, particularly where the handle meets the embosser plate. Regular inspection allows you to identify micro-fractures before they fail during a project. Because you own the source files, replacement is instantaneous. Keep a record of which print settings yielded the most durable results, creating a personal knowledge base that optimizes future production runs. This systematic approach to maintenance ensures that the Cherry Embosser Cookie Cutter remains a reliable asset in your creative arsenal, supporting consistent quality and efficient workflow execution across seasons and projects.